Wednesday 25 June 2014

Aubergine & Courgette Bake

I first made aubergine parmigiana last year while following the ketogenic diet and I fell in love with it. It was everything you needed while following a diet; it was – healthy, hearty, cheesy, vegetarian, and absolutely delicious – which is when I had the idea for this Aubergine and Courgette bake.

After completing day 2 of the insanity workout I needed something – healthy, hearty, cheesy, vegetarian, and absolutely delicious and since I had no parmesan here to make, aubergine parmesan, I decided to combine the aubergine with some courgette, tomato sauce, cheddar and mozzarella, and to my pleasure, it was amazing; although there is always room for improvement – a little cheese sauce would have been lovely, which is exactly what I will add next time. 


Ingredients
  • Courgette
  • Aubergine 
  • Olive Oil
  • Chopped Tomatoes
  • Basil
  • Garlic
  • Himalayan Salt
  • Cheese
  • Mozzarella

Instructions

Slice both your courgette and aubergine into thin slices and place the aubergine on a separate plate with some salt, add a chopping board or another plate on top, then leave for 20 minutes – this will remove any moisture, or bitterness that the aubergine may have.

When you’re waiting for the aubergine you can prepare your tomato sauce. The recipe I have is for a convenient tomato sauce, but if you would prefer to make your own then you can do that - I have a recipe for a homemade tomato sauce coming up soon. 

In a bowl add your chopped tomatoes, crushed garlic, basil and a pinch of Himalayan salt, and combine. Next you will need to wash the salt off the aubergine and then dry the slices with a paper towel. Brush your aubergine slices with some olive oil and fry them on a low heat, until the slices have turned clear in colour - if the aubergine start to burn, add more olive oil.

When all your aubergine slices have been cooked, you can now add the courgette and aubergine to your baking dish, adding tomato sauce and cheese to each layer, and top with the remaining cheese.
Cover the baking dish with foil and cook at 200°c for 40-60 minutes.
It’s as simple as that. 

You can serve the aubergine and courgette bake with a side salad, or more vegetables. I had brussel sprouts with rosemary and more himalayan salt - perfect. 

The Hungry Welsh Girl.

Friday 20 June 2014

Sesame Covered Carrot Fries, with a Sweet & Spicy Sauce.

I’ve noticed lately that I have started eating vegetables that I never would have touched as a child, even last year I was still sceptical of these vegetables and would avoid them at all costs – now I eat them with enjoyment and look forward to my next recipe experimentation with the vegetable. Carrots were one of those vegetables I just couldn’t get my taste buds to appreciate – until this week. This week I have eaten carrots twice, twice with the same ingredients, and twice with different variations – I must be getting adventurous in my old age because both times I found them delicious, and I’m not just saying it.  

So what did I make? Well, today I made carrot fries. I know what you’re all thinking, I thought the same thing when I saw vegetable fries doing the rounds on Instagram – they’re not potato fries. I’m not entirely sure whether the vegetable fries are supposed to be healthy versions of potato fries - I know they’re fries but they taste nothing like potatoes – obviously. So do people eat these instead of potato fries? I guess I’ll have to do more research. I on the other hand have started experimenting with vegetable fries because I’m a vegetarian and new meal ideas are always welcome to a vegetarian table - although, if I wanted potato fries I would make those too – I see nothing wrong with it.

Sesame Covered Carrot , with a Sweet & Spicy Sauce.
Like every single recipe I ever make, this was simple and quick – I had it for lunch and it took me about 20 minutes to prepare and cook. I actually love how the natural sweetness of the carrots tasted when combined with the sweet and spicy sauce, it was a completely different taste to my Carrot and Parsnip Kinpira - even though the ingredients were the same - minus the parsnip. 

Ingredients – Carrot Fries
  • Chunky Carrots
  • 1 tbsp – Sesame Seeds
  • Coconut or Sesame oil


Instructions

Peel your carrots and cut them into sticks, place them in a bowl with the sesame seeds and oil – if you use coconut oil, make sure to melt it first. Combine the ingredients and place them on a lined baking tray, and pop them into the oven for 20 minutes at 200c. 


IngredientsSweet & Spicy Sauce
  • 3 tbsp Gluten free Soy Sauce
  • 1 tsp - Pure Honey
  • 100ml Water
  • Chilli
  • Coriander
  • Garlic Clove
  • Ginger

Instructions

Place everything into a saucepan and bring to the boil for 2 minutes, then let the sauce reduce on a low heat until it’s to your desired consistency.

Told you it was simple didn't I?

Now plate up and enjoy. 

Hwyl Fawr
The Hungry Welsh Girl. 

Crempogs with Honey

Last night I devoured a welsh cake in a matter of seconds. It was everything a welsh cake needed to be - not too thick, not too dry, smooth and buttery on your tongue - it was beautiful.  However, for the next hour after I was itching like a dog with fleas - it wasn't fun. That’s when I knew I needed to make something sweet and gluten free. My initial idea was to make Welsh cakes with a healthy twist, but I’d never made Welsh cakes before, so that idea went out the window. That’s when I thought of making pancakes - which were like welsh cakes, but I didn't have any currants, so I decided on plain crempogs.

Crempogs are welsh pancakes, which are usually eaten on Shrove Tuesday. Traditional crempogs are usually thicker than my end result - like Welsh cake thick, but I ran out of coconut flour and made my batter too wet by adding vanilla extract.

Crempogs with Honey. 
As I mentioned above these crempogs were made with coconut flour, which makes them; gluten free, grain free, wheat free, healthy and have a bunch of other benefits that I won’t ramble on about here. However, if you are interested in finding out more on coconut flour, you can visit this website here. Traditional crempogs are made with self rising flour, but obviously I wanted to make healthy pancakes so opted for coconut flour. At first coconut flour can be tricky to use, as it drinks liquid like a thirsty camel, but I’m happy to announce that after a whole year of experimenting with coconut flour and pancakes, I very rarely get a bad batch of pancakes; which is why I knew this recipe was going to be successful.

I was so convinced this recipe was going to be a triumph that I even went as far as to make my own buttermilk – which was super easy to make, and had no nasty ingredients in it just; full cream milk, lemon juice and to let it stand at room temperature for 10 minutes, or longer – easy as your ABC. Now that I had my buttermilk it was time to make the crempogs.

Ingredients - Buttermilk
  • 80ml Gold Top Jersey Milk - or milk of choice. 
  • 1/2 tsp- Lemon Juice, or Apple Cider Vinegar - too much will result in a bitter buttermilk.
Instructions 

In a jar, container, or measuring cup at the milk and lemon juice, then leave stand for 10 minutes, or longer. As soon as your milk splits, you have buttermilk. It's really that simple. 


Yield6 Crempogs
Ingredients
  • 25g – Coconut Flour
  • 2 Eggs
  • 15g – Grass-fed, or Organic Butter
  • Buttermilk
  • ¼ tsp – Baking Powder
  • 1/4  tsp – Bicarbonate of Soda
  • ½ tsp – Apple Cider Vinegar
  • 1/8 tsp Himalayan Salt
  • Sugar substitute

NB: You can adjust any of the ingredients above to suit yourself, or your dietary needs, although I’m not sure if the end result will be the same.

Instructions

By this point you should have your buttermilk ready, if not follow the steps I noted above.
Warm your buttermilk in a saucepan, or microwave, then pour over the butter and stir until the butter has melted.

Next pour the butter and milk into the coconut flour and combine.  – The coconut flour turned into a lumpy, almost dough- like mass, I’m not sure if this would happen with self-rising flour, but I added a tablespoon of milk and then left it.

 In a separate bowl add the eggs, bicarbonate of soda, baking powder, sugar substitute, salt and apple cider vinegar and beat. When everything is well combined add the mixture to the coconut flour and again combine thoroughly, until the mixture turns into a thick, heavy batter – which is what you want. Do not add any more liquid at this stage, or it will turn thin. You will also see little bubbles forming and bursting in the batter, again this is good as it will help your crempogs rise.

Leave the batter for 20 minutes to thicken.

Heat a non stick frying pan on a low heat, with butter, or coconut oil and when the pan is warm enough, spoon in your batter. Your pancakes should immediately start forming bubbles and resemble something like a crumpet, when the top of the pancake looks cooked, flip and cook the other side. Continue this process until all your crempogs are cooked. If you are cooking for more than just yourself – yes I did eat that entire batch to myself – you can put the cooked crempogs into an oven, on a low heat to keep warm.

Because these crempogs were cooked with grass-fed butter, I didn't want to add anymore unnecessary calories so I kept the crempogs simple with a nice helping of pure honey and they were delicious. The crempogs were fluffy from the buttermilk and weren't at all dry from the coconut flour, which can happen with coconut flour, so don’t be alarmed if you alter the above recipe and get a dry, crumbly mess – it’s happened to me too.

Hope you all enjoy these crempogs as much as I did.

Hwyl Fawr

The Hungry Welsh Girl. 

Wednesday 18 June 2014

Carrot & Parsnip Kinpira

I remember someone suggesting Carrot Kinpira to me last year, as another vegetarian dish which I could try, but back then vegetables were the last thing I wanted to eat - bread, pasta, and everything except vegetables were what I preferred.

Today however I was stuck for dinner ideas, when I remembered the Carrot Kinpira suggestion, and I just had to try it. Usually I'm not one for carrots, I never liked them growing up and hated them even more throughout my adulthood - until today that is. Today I discovered that carrots aren't the most disgusting vegetable ever grown, I learned that I do in fact like carrots and that this recipe could end up being a firm favourite of mine, both to eat and to experiment with.

Carrot & Parsnip Kinpira
For those of  you who are wondering what Kinpira is, it is basically a Japanese cooking style, which is commonly used to saute, or simmer root vegetables. However, I used my cast iron pan to make this Carrot and Parsnip Kinpira but I think a wok would work much better.

Yield  - 1 Serving 
Ingredients 
  • Carrot 
  • Parsnip
  • Sesame Seed Oil 
  • 1 tbls - Sesame Seeds
  • Garlic Clove 
  • Ginger 
  • Chilli, or Chilli Powder
  • 1 tbls - Soy Sauce 
  • 1 tsp - Honey 
  • Himalayan Salt 
Instructions 

Before you start heating the wok you will need to peel some carrots and parsnips with a sharp vegetable peeler, next you will need to julienne the vegetables. There are a few ways to julienne the vegetables, you can manually cut the vegetables into thin, matchsticks, you can use a spiralizer, or a julienne peeler - this is the method I use and its really simple and quick - just watch those fingers. 
Julienned Carrots & Parsnips
When your vegetables are all peeled and julienned, heat a frying pan, or wok with the sesame seed oil, and toss in some crushed garlic and ginger, and saute for a few seconds.

Now you can add in your vegetables and saute them until they are tender, but with some crunch, then add in the; Sesame seeds, Chilli powder, Soy sauce, Salt and Honey, and combine with all the vegetables. 

Plate up in your favourite bowl and enjoy - you could even use a pair of chopsticks for that extra bit of fun.

The Hungry Welsh Girl.

Monday 16 June 2014

Aubergine & Red Pesto, Courgette Parcels.

A few weeks ago I came across a post on Pinterest that interested me - low carb ravioli are what the people of the low carb community are calling them - I however, prefer to call them courgette parcels, since they resemble ravioli as much as I resemble Marilyn Monroe - trust me it ain't happening! Courgettes and pasta are two completely different textures and more importantly - one is a vegetable and the other is a... Well pasta - so they are incomparable.

This recipe was definitely something different to experiment with and also something new for my taste buds - which all vegetarians will agree, can be tough to keep the ole taste buds excited - right? The only downfall I found with the courgette parcels were that they seemed a bit of a fuss to make - and I'm quite lazy when it comes to fuss. Nonetheless I put on my big girl pants and gave it ago - and I'm pleased to announce that they were a great success.

Aubergine & Red Pesto, Courgette Parcels.
Although, I wasn't expecting much from the courgette parcels - I mean I did find them on Pinterest - rarely anything goes to plan from there, but this idea did and they are now a firm favourite of mine, and also paired with a nice sauce they make a perfect light lunch.
 For this recipe I made a quick tomato sauce and combined it with some vegetarian 'meat' leftovers from the previous nights dinner to top the courgette parcels off with. I thoroughly enjoyed them - the best part - it only took me 30 mins to prepare, cook and inhale. What more could you possible ask for? 

Before I give you the recipe, I will say that these courgette parcels need a decent size courgette in order to make nicely sized parcels. However, I did use a scrawny one with my initial attempt and it worked - they were just on the small size. The courgette also needs to be firm, with no soggy parts, otherwise when you cut the courgette the slices will rip - although you can still use the ripped slices, I jut prefer them whole - can you tell I'm OCD? 

Anyway, I think that's enough jabbering - now for the recipe. 

Yield - 4 Servings 
Ingredients - Courgette Parcels 
  • 1/2 Courgette 
  • 1/2 Aubergine 
  • 1 tbsp - Red Pesto 
  • 1 tbsp - Olive Oil 
  • Basil 
Instructions 

With a vegetable peeler slice the courgette parcels from top to bottom, to make thin, flat slices 
Dice your Aubergine into small chunks - you can use as much Aubergine, or courgette as you please - I'm just going by my own measurements - then place the Aubergine into a blender and mince until it resembles cous cous.
While your Aubergine is blending, heat a non stick - or cast iron pan with a little oil and fry off the Aubergine with some Himalayan salt.

NB: if you use a cast iron pan for this step - do not add the pesto to your pan if it has any acidic ingredients, as this will take the seasoning off your pan and your food will be ruined. 

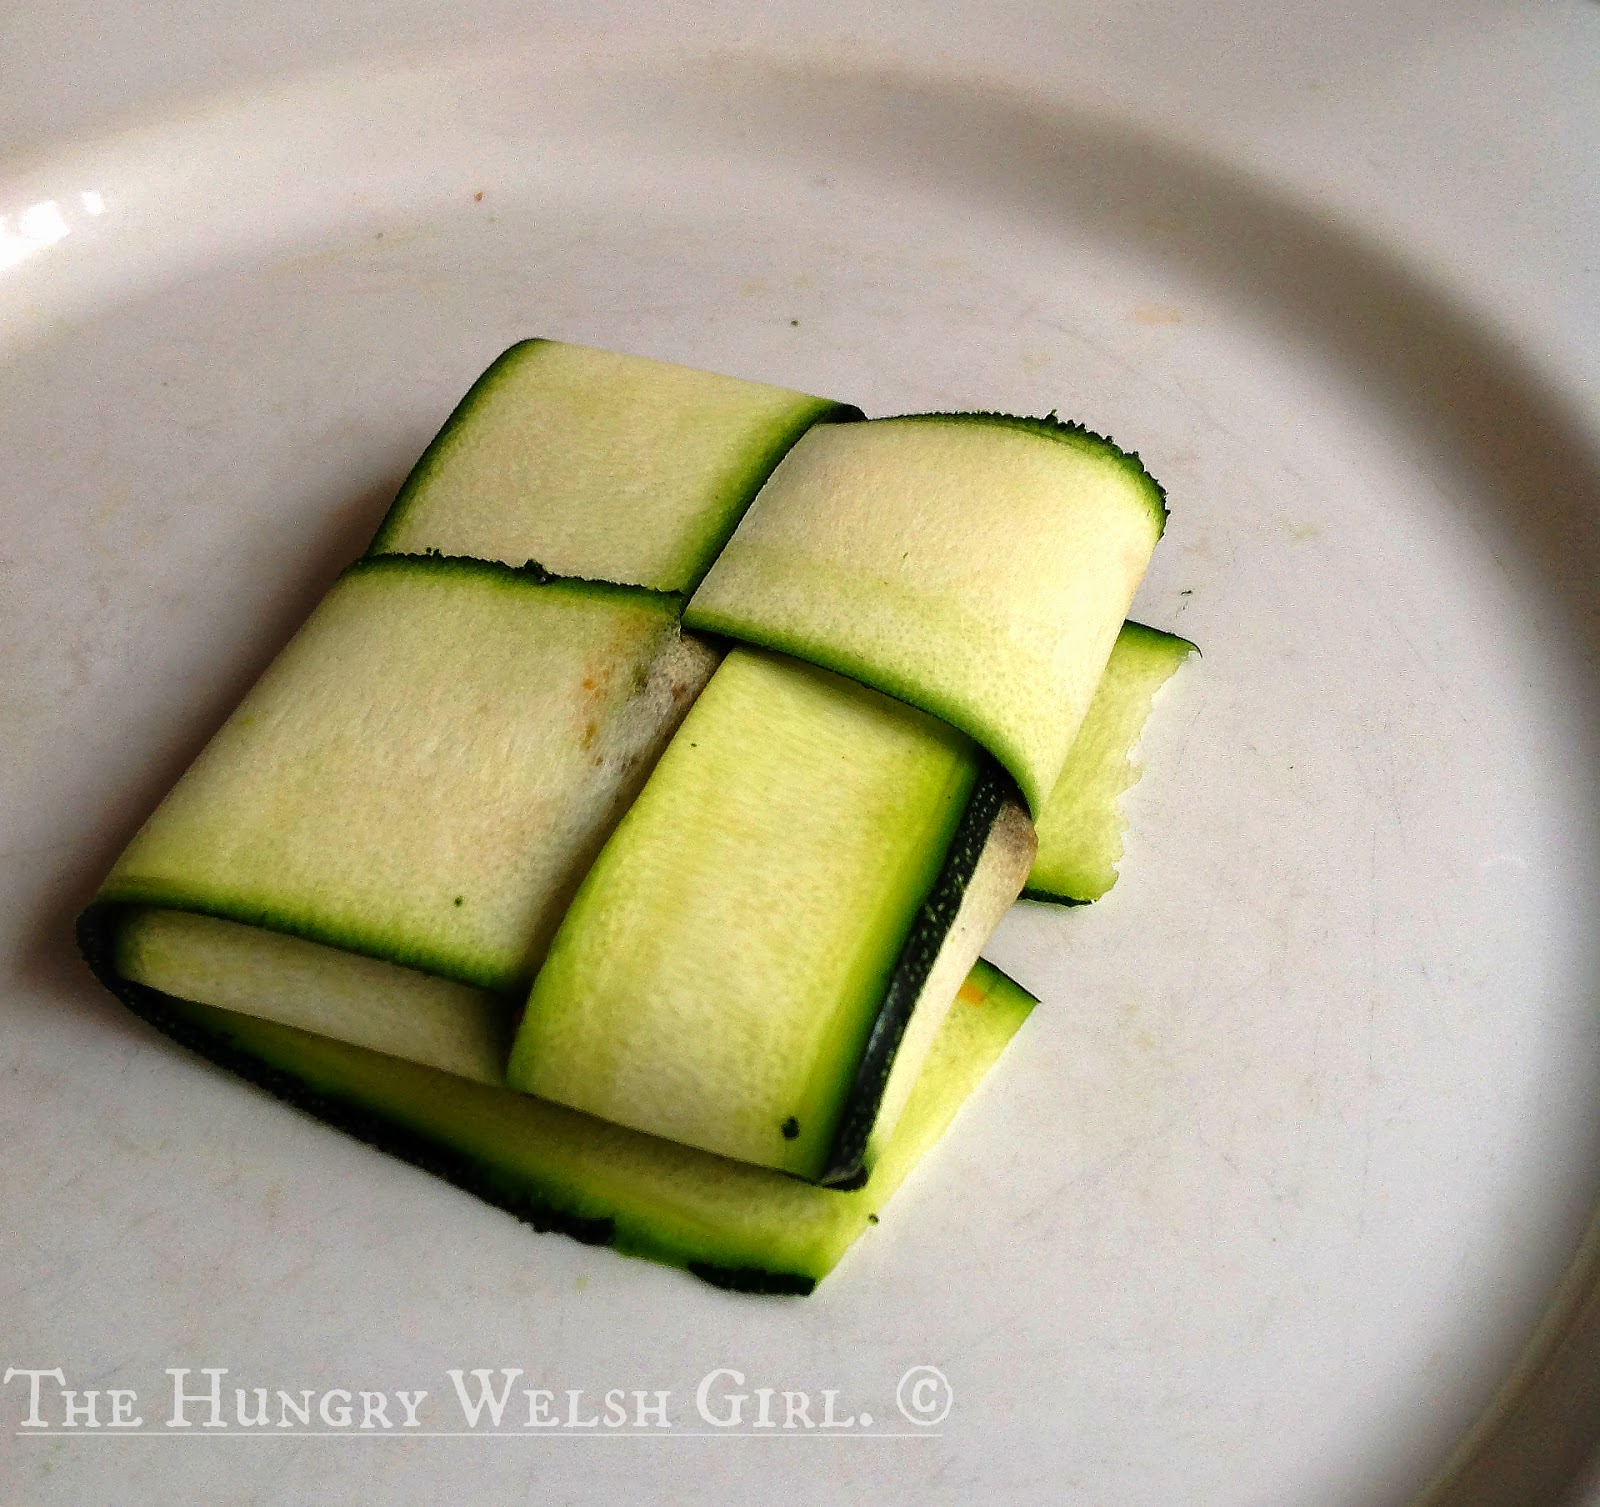
Next criss cross, or hash-tag your courgette parcels and place the Aubergine mixture into the centre of the courgette hash tag

Courgette Hashtag, with Aubergine Filling
 Now fold in all the sides until you have a nice, little parcel - this can take some time as it is a bit tricky and it did take me a few goes until I cracked it - I was never very good with celtic patterns at school either.
Aubergine & Red Pesto, Courgette Parcel
When your done, place them folded side down on an oiled baking tray - and brush them with the remainder of your olive oil. You can now bake them for 15-20 mins on 180-200c

Aubergine & Red Pesto, Courgette Parcels.
Now that your courgette parcels are in the oven and on their way to pure deliciousness, you can make the sauce. 

This vegetarian meat sauce recipe can easily be made for meat lovers - just simply add the mince meat of your choice - I used Quorn mince for this part, as it's the only meat substitute I have found that isn't made with soya products.